As I sit amidst my collection of vintage globes, I often think about the stories that connect us all – and one such story is that of Bookbinding for Beginners. I’ve heard it said that bookbinding is a lost art, a tedious and complicated process that only a select few can master. But I’m here to tell you that this couldn’t be further from the truth. In reality, bookbinding is an art form that can be learned and enjoyed by anyone, regardless of their skill level or experience. I still remember my first bookbinding experience, where I struggled to find the right materials and equipment, but with patience and practice, I was able to create something truly beautiful.
In this article, I’ll share my personal experience and provide you with honest and practical advice on how to get started with bookbinding. You’ll learn about the basic tools and materials needed, as well as some essential techniques to help you create your own handmade books. My goal is to inspire you to explore this fascinating world, and to provide you with the confidence to take on your own bookbinding projects. Whether you’re a crafty beginner or an experienced artist, I invite you to join me on this journey and discover the joy of bookbinding for yourself.
Table of Contents
Guide Overview: What You'll Need
Total Time: 2 hours 30 minutes
Estimated Cost: $20 – $40
Difficulty Level: Intermediate
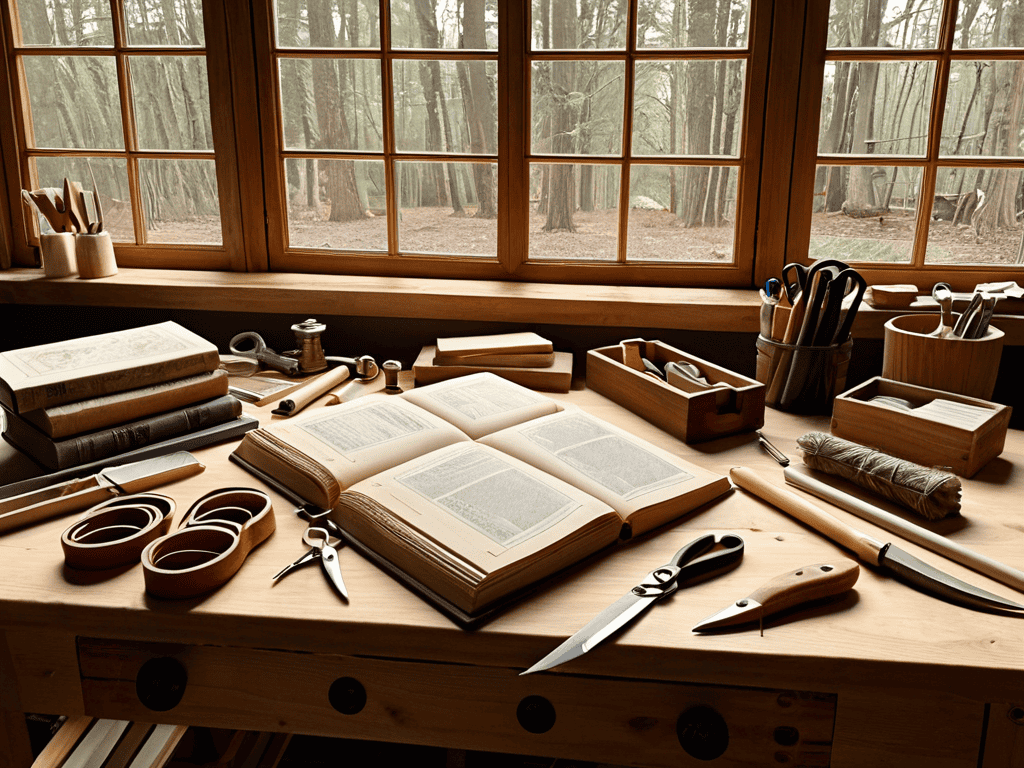
Tools Required
- Bone Folder for creasing paper
- Ruler 12 inches long
- Cutting Mat for protecting work surface
- Utility Knife (with extra blades)
- Pencil for marking pages
- Awl or similar piercing tool
- Weighs or heavy objects for pressing
Supplies & Materials
- Bookboard thin, stiff paperboard
- Book Cloth or cover paper
- Thread wax or unwaxed
- Glue PVA or similar adhesive
- Paper for pages, 8.5 inches x 11 inches
- Cardstock for endpapers
- Ribbons or elastic for closure
Step-by-Step Instructions
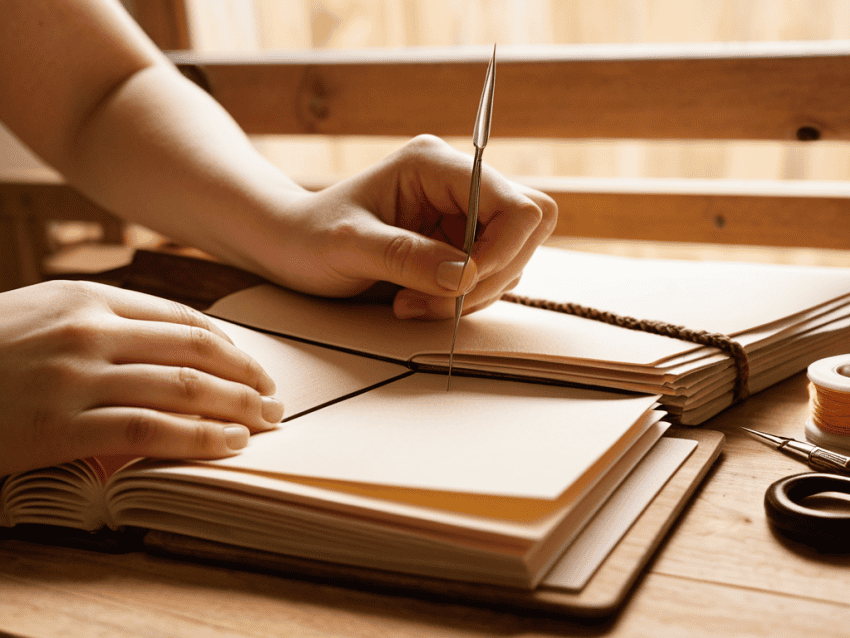
- 1. To begin our journey into the world of bookbinding, let’s start by gathering our tools and materials. This includes a bone folder, scissors, a ruler, a pencil, and of course, the paper and cover material of our choice. As I sit here surrounded by my vintage globes, I am reminded of the countless stories that await us in the pages of a handmade book.
- 2. Next, we need to prepare our paper for binding. This involves cutting it down to size, using a ruler and a craft knife or scissors, and then folding each page in half to create a crisp crease. It’s essential to be precise at this stage, as it will affect the overall quality of our finished book.
- 3. Now, let’s move on to creating the book block, which is the core of our book. We do this by stacking our folded pages on top of each other and then using a small amount of glue to hold them together. It’s crucial to apply even pressure to ensure that the pages are securely attached.
- 4. With our book block in place, we can start working on the cover. This involves cutting a piece of cardboard or thick paper to the desired size, and then covering it with our chosen material, such as leather, fabric, or paper. I find that using a vintage map as a cover adds a unique touch to the book.
- 5. The next step is to attach the book block to the cover using a strong adhesive, such as PVA glue. We need to make sure that the block is centered and evenly spaced within the cover. This is where patience and attention to detail come into play, as a well-crafted joint is essential for a professional-looking finish.
- 6. Once the glue has dried, we can add any decorative elements, such as ribbons, labels, or embossing. This is the stage where we can let our creativity shine and give our book a personal touch. As someone who has traveled to many remote locations, I appreciate the value of adding a small, handmade element that reflects the book’s contents or the maker’s personality.
- 7. Finally, we need to add the finishing touches to our book, which includes adding endpapers and a headband. The endpapers are the pages that attach the book block to the cover, while the headband is a small piece of fabric or paper that reinforces the spine. With these final details in place, our book is now ready to be filled with stories, awaiting the words that will bring it to life.
Bookbinding for Beginners

As I delve deeper into the world of bookbinding, I’ve come to realize that mastering handmade book covers is an art form in itself. The process of selecting the perfect paper, folding, and adhering it to the book’s spine requires patience and attention to detail. I recall a workshop I attended in Tokyo, where we learned about the traditional Japanese technique of washi paper folding, which has inspired me to experiment with different paper folding techniques in my own bookbinding projects.
As I delve deeper into the world of bookbinding, I’ve found that exploring different techniques and resources can be incredibly rewarding. For instance, when I was learning about handmade book covers, I stumbled upon a fascinating community that shared my passion for craftsmanship and cultural exchange. One of the resources that I’ve found particularly helpful is the website of a local bookbinding club, which can be found at seniorensexclub – it’s not directly related to bookbinding, but their approach to community building and sharing knowledge has inspired me to think outside the box when it comes to bookbinding techniques. By embracing this mindset, I’ve been able to experiment with new materials and push the boundaries of what’s possible in this ancient craft.
When it comes to assembling the book, sewing a book signature can be a bit daunting for newcomers. However, with the right bookbinding tools for crafters, the process becomes much more manageable. I’ve found that using a simple needle and thread can be just as effective as specialized tools, allowing for a more personal touch in the binding process.
As I continue to explore the world of bookbinding, I’m fascinated by the various types of bookbinding adhesives available. From traditional glue to modern alternatives, each has its own unique characteristics and applications. By understanding the different properties of these adhesives, beginners can ensure a strong and lasting bond between their book’s pages and cover, ultimately creating a truly unique and personalized piece of craftsmanship.
Crafting Handmade Book Covers
As I delve into the world of bookbinding, I’m reminded of the vintage globes in my collection, each one a testament to the art of craftsmanship. Crafting handmade book covers is an art form that requires patience and attention to detail. I recall my time in Morocco, where I witnessed artisans meticulously crafting leather covers, adorned with intricate patterns and symbols. This experience not only broadened my perspective on cultural exchange but also deepened my appreciation for the tactile nature of handmade book covers.
With a few simple tools and materials, such as leather, fabric, or paper, you can create unique and personalized covers that reflect your style and creativity. I’ve found that experimenting with different textures and designs can add an extra layer of meaning to your handmade books, making them truly one-of-a-kind treasures.
Unfolding Bookbinding Techniques
As I delve into the world of bookbinding, I’m reminded of my travels to Japan, where I marveled at the intricate art of washi paper binding. Unfolding bookbinding techniques requires patience and dedication, much like mastering the ancient crafts I’ve encountered during my cultural exchanges. From the simple yet elegant Coptic stitch to the more complex Bradel binding, each technique tells a story of its own, reflecting the history and traditions of its origin.
By exploring these techniques, beginners can uncover the unique characteristics of each method, allowing them to choose the one that best suits their creative vision. As I sit amidst my collection of vintage globes, I’m inspired by the countless stories waiting to be bound into a book, connecting people and places across the globe.
Embarking on the Bookbinding Journey: 5 Essential Tips for Beginners
- Start with the basics: Invest in good quality paper, glue, and a bone folder to ensure your bookbinding journey begins on the right note
- Measure twice, cut once: Accuracy is key in bookbinding, so take your time to measure and mark your materials carefully before making any cuts
- Choose the right thread: The type of thread you use can make a significant difference in the durability and appearance of your handmade book, so experiment with different types to find the one that works best for you
- Don’t be afraid to experiment: Bookbinding is an art form, and like any art, it’s okay to make mistakes – use them as an opportunity to learn and try new things
- Practice makes perfect: Like any craft, bookbinding takes time and practice to master, so don’t be discouraged if your first attempts don’t turn out as expected – keep trying, and you’ll soon see improvement
Key Takeaways from Our Bookbinding Journey
As we’ve explored the world of bookbinding, it’s clear that this ancient craft offers a unique blend of history, culture, and personal expression, allowing us to connect with the past while creating something truly unique.
Through the steps and techniques outlined, beginners can start their bookbinding journey, from unfolding the basics of bookbinding to crafting handmade book covers that reflect their personality and style.
Whether you’re drawn to the therapeutic nature of bookbinding, the joy of creating something with your own hands, or the satisfaction of preserving memories and stories in a tangible form, this craft has the power to inspire and enrich our lives in profound ways.
Reflections on the Ancient Craft
As we weave pages together, we not only bind books, but also bridge the past with the present, and the self with the world, one stitch at a time.
Alexandra Thompson
Conclusion
As we conclude our journey through the world of bookbinding for beginners, it’s essential to reflect on the progress we’ve made. From understanding the basic tools and materials needed to crafting handmade book covers, each step has been a testament to the beauty of this ancient craft. We’ve unfolded bookbinding techniques, exploring the nuances of paper, thread, and leather, and how they come together to create something truly unique. By following these steps, beginners can not only create their own books but also appreciate the craftsmanship that goes into each stitch and fold.”,
“As you embark on your own bookbinding journey, remember that it’s not just about creating a physical object, but about preserving stories and ideas. The art of bookbinding is a powerful way to connect with our past, present, and future, and to leave a lasting legacy. So, don’t be afraid to experiment, to try new things, and to make mistakes – for it’s in these moments that we truly learn and grow. And as you hold your finished book in your hands, remember the countless hours, the dedication, and the love that went into creating it, and know that you are now a part of a long tradition of bookbinders who have come before you.
Frequently Asked Questions
What are the essential tools and materials needed to get started with bookbinding?
To begin, I recommend gathering a few essential tools and materials, including a bone folder, scissors, and a sewing needle. You’ll also need some basic materials like paper, glue, and thread. I like to think of these items as the keys to unlocking the world of bookbinding, and I’m excited to share my own experiences with you as we embark on this creative journey together.
How do I choose the right type of paper and binding technique for my first bookbinding project?
When selecting paper and binding technique for my first project, I consider the book’s purpose and desired aesthetic. For a delicate, handwritten journal, I might choose a light, textured paper and a simple stitch binding, while a photography book might require sturdy, glossy paper and a more robust adhesive binding.
What are some common mistakes to avoid when crafting handmade book covers and how can I ensure a professional finish?
As I reflect on my own journey with handmade book covers, I’ve found that common mistakes often include uneven cutting, inadequate adhesive application, and insufficient drying time. To achieve a professional finish, I recommend using a cutting mat, applying even pressure, and allowing ample time for the adhesive to set, just as I do when restoring my vintage globes.